
 English


2 Easy Ways To Enable Voice Search On WordPress Websites

Do you want to display the microphone icon in your website’s search bar just like Google’s search field? It can be done if you know how to enable voice search on WordPress websites. It will allow your visitors to simply click the symbol and speak to conduct a search. In this article, two methods are being presented for introducing the feature. Both of them are quite simple and even people with limited technical knowledge can do them easily. Unless you are completely technically challenged, you will not need to hire a WordPress developer to carry out the process. This feature will enhance the user experience of your interface as visitors will be saved the hassle of typing. It will also be well-received by differently-abled people as they can orally conduct a search. Let’s take a look at both the methods to introduce this beneficial feature in WordPress interfaces.
What Is Voice Search?
When the searching action can be triggered through an oral command, it is defined as a voice search. A microphone icon in the search bar signifies that the feature is activated on an interface. It gives an additional option to people for entering a search input. They can choose the usual method of typing or click the symbol and speak their query. However, the website visitors must have a device with a speaker in order to use the service.
Providing this facility makes sense as most of the internet traffic these days is being driven by smart devices. These gadgets have in-built speakers which can be used to initiate a verbal search. Mobile users also find it difficult to type on small virtual keyboards of their devices. Asking a question orally helps them by eliminating the need to type. Integrating speech recognition capabilities in an interface will also be helpful to people with special needs. They do not need to depend on others while navigating through your website. It will improve the engagement of visitors with the website and they will spend more time exploring different sections. This will definitely be seen as a positive user experience signal by Google which may result in improved SERP rankings.
Let’s now take a look at the two methods for incorporating the feature in WordPress interfaces.
1. Using A Code Snippet
The first method to enable voice search on WordPress websites involves adding just a bit of code to your interface. Many beginners start feeling nervous at the slightest hint of coding. However, this is not a complicated process at all. There are just a few lines which will do the needful. The CSS will ensure that the microphone icon is displayed in the search field of your interface. The JavaScript will ensure that your website starts recognizing speech.
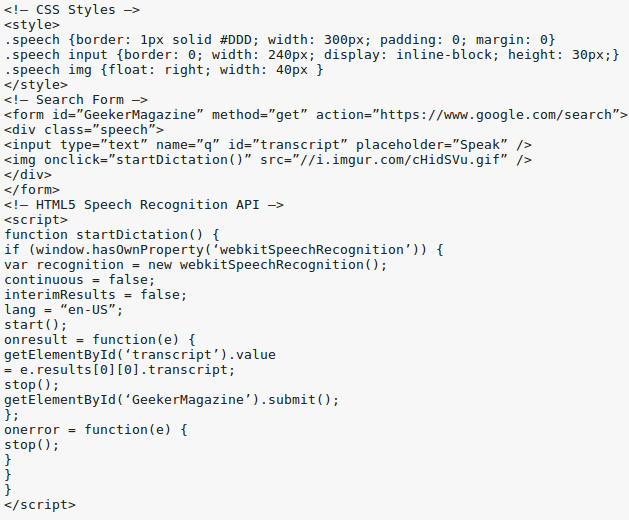
Just add the lines shown in the above image to your website and voice search will be activated on it. Earlier, people were using the HTML5 speech recognition API in which they added the “x-WebKit speech” attribute to a chosen form field. However, this approach is no longer used for reasons unknown. The method explained here does not cause any problems.
It will work with widely-used browsers like Google Chrome and Firefox which support speech recognition. A user must open the website in a compatible browser and click on the icon to initiate an oral search. Now the JavaScript will first ensure that the browser does indeed support the feature. It will then await the arrival of the transcribed text from Google’s servers. It will then complete the process by submitting the form. The user will be able to see the related results in just a few seconds without needing to input any text.
2. Using A Plugin
One of WordPress’ most attractive and helpful features are plugins. You can extend the functionality of your website effortlessly through these tools. The large development community ensures that at least one plugin exists for a conceivable functionality. The second method for adding voice search to an interface also uses a plugin. This will be found useful by people who do not want to use the above code-based process.
In this tutorial, we are using a plugin called “Voice Search”. It is an open source software which means you do not need to spend any money for using the tool. Use the following steps to enable speech recognition on your website:
Step 1: Install The Plugin
Access the admin dashboard of your WordPress installation. Go to the menu on the left-hand side and locate “Plugins”. Click on it and go to “Add new”. Enter the name of the plugin in the search box. Locate it in the results and download its files. Once the installation is complete activate the plugin on your interface. As soon as it is activated, the tool will start working. You do not need to configure any settings to make it function.
Step 2: Add A Widget
In case, a search widget is functioning on your website, you do not need to do this step. Visit your interface and you will see the microphone symbol in the field. In case, there is no search option provided on the interface, you will have to add one.
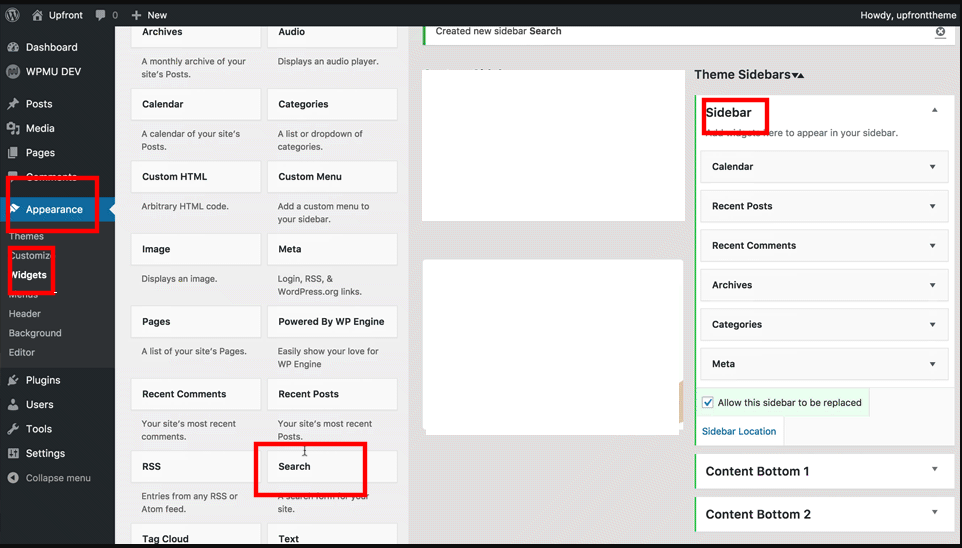
Revisit your dashboard and go to “Appearance > Widgets ”. Drag the default WordPress search widget and drop it into the sidebar. The feature will now start working on the interface.
Conclusion
It will be beneficial to enable voice search on WordPress websites. The feature will make searching a convenient task for visitors and improve the overall user experience of the interface.